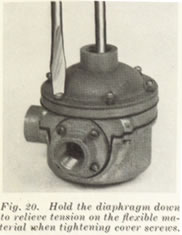
29 . Assemble the piston stop and hydraulic connection Fig. 16 but
do not tighten at this time.
30. Place a few drops of clean hydraulic brake fluid inside the control valve
cylinder. Also dip the plunger and rubber cup in brake fluid, and assemble these
parts.
31. With the lock nut turned up to the end of the threads on the control valve
hydraulic cylinder, screw the cylinder all the way into the control valve cover
but do not tighten lock nut at this time.
Vacuum Cylinder Assembly
32. Install a new piston rod leather seal in the center plate after soaking
the seal in vacuum cylinder oil. See Fig. 11. Piston rod leather seal
should be seated after assembly in center plate to prevent vacuum leaks between
seat and seal in center plate. A short length of round stock, flat on end, 1-5/8”
diameter, for units having 1-1/2” piston rods, or 1-3/16” diameter
for units having 3/4” diameter piston rods, tapped with hammer will seat
the seal properly and prevent vacuum leaks.
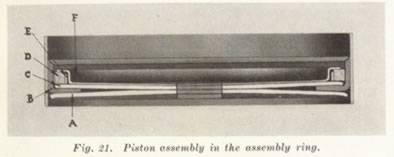
33. Assemble the front piston in an assembly ring, use Bendix Tool* Fig.
21. Place the large diameter piston plate “A” in the ring.
Brush a generous ring of shellac or sealing compound around the hole in piston
plate.
34. Place the leather packing“B” on top of the plate with the lip
up ward.
Page <15>